Quantcast
Channel: Affnan's Aquaponics
Viewing all 276 articles
Browse latest View live

Reducing Carbon Foot Print

$
0
0
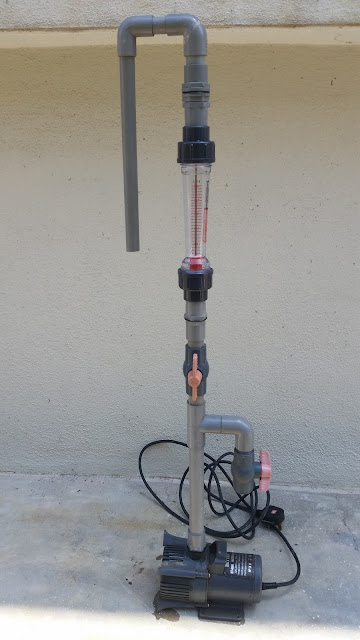
Replacing the single pump with two smaller unit that consume less power and making it simpler for water to the growbed. The current pump that I use has excess capacity that wasted by diverting it away from growbed, this only increase the power requirement of my CRAFTS set.

So the Resun Penguin 4500 has to go out and in its place are two smaller pump that I have laying around doing nothing. I'll use these two pump until it fail and then will replace with a more efficient pump that I can get later on.

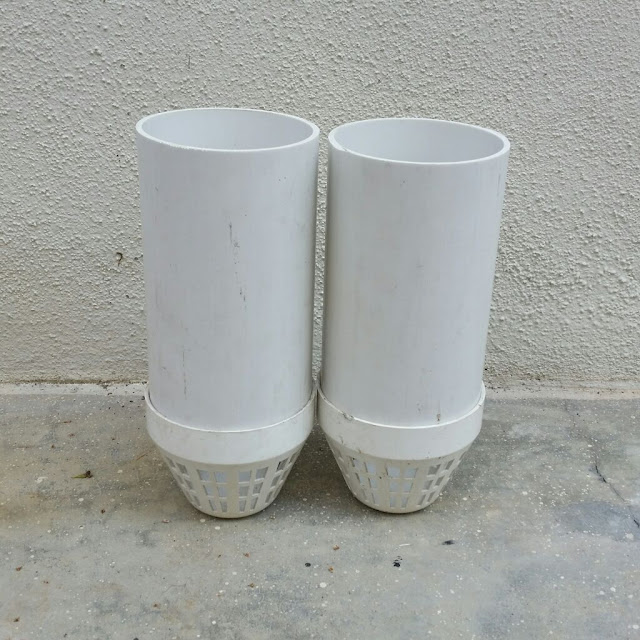
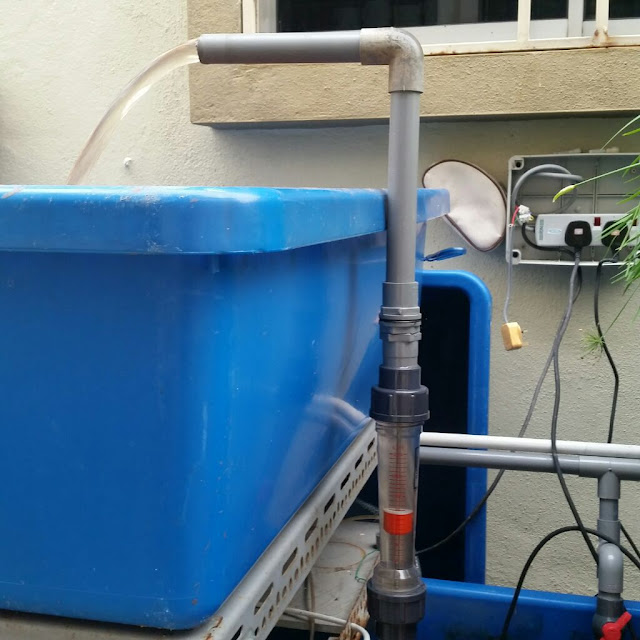
The EHK 105 pump above feed the two right growbed and below the Astro 2000 will feed the left two.

I remove the timer and will run the pump 24/7, evaluating to stop running the aerator pump at night if the two pump can supply enough oxygen to the fish.

I may put the aerator on timer as a backup if the water pump fails. However for this next few weeks I'll let it run on photo cell control which only switches it on at dusk.

Will see how it goes.


Water Flow Gauge

$
0
0
Making this simple device to measure water inflow to growbed. This is helpful since I can then document siphon water operating range. which now is not so accurately done.

I use the Bettas BT 6000 pump as the water source and a mechanical flow rate gauge utilizing float type weight to shows water flow rate.

Two stop cock use, one as diverter and the other just to provide restriction just incase the diversion is not enough.

Below a short video presentation of the flow tester.

Resun Penguin Pump Dismantling

$
0
0
Lets see what this pump looks like, its been running good for the last few years. I decide to stop its usage to reduce my Aquaponics set carbon foot print.
This Resun Penguin was bought on 26th June 2009, not bad it run for at least 5 years.
Short video presentation of the pump.


Thanks for watching

Bettas BT 6000 Pump Assembling after cleaning.

$
0
0
A short video on assembling this pump after cleaning done.

Thanks for watching.

Silos Growbed Flood & Drain Aquaponics

$
0
0
What is Silos Growbed.

This is the term that I'm going to use to describe the potted media base flood & drain aquaponics. It is a mouthful to say and giving it a short name will be easier for me. Furthermore it's good to be able to identify a planting method by a reference term.

What I am trying to do now, it making the aquaponics less costly and more efficient, that's the reason for the gutter growbed flood & drain system that I am currently experimenting. Taking a step further, why not make a new style by using cylindrical tubes or containers that is filled with media and stick it into a flood and drain system.

The container can stand in either media or on its own in a flood & drain water. Each containers for ease of reference I called it a Silo from that tall cylindrical silos or those missile silos. Each functioning silos is a mini growbed on it own and thus will be treated like any growbed.

There are 3 type of silos.
  1. Growth Silos, this is a silos that have plants growing in it.
  2. Dormant Silos, is a silos filled with media in the flood and drain system without any plants. This is to provide a ready planting area and also to increase media surface area.
  3. Blank Silos, this is an empty silos that being use to take up space within a growbed in order to provide support for other silos or to gain access to certain area in the growbed.
Figure below is a simplified diagram of the Silos Growbed System

For trial I am using 4 inches uPVC pipes with its venting cowl as a silo unit. Each of this unit will take up space within a growbed or a gutter system, if gap are required they could be filled with a Dormant or Blank Silos.

Silos are filled with hydroton initially up to the strainer top.

Plants, I am testing and use the existing cili plant as a trial and Basil from cuttings. Once the plants or cutting has been place inside the silos, top up hydroton to full.

Testing Basil from cuttings apart from cili transplant.

Cili below, these are old plants that I redo to these silos.

I do not have a dedicated growbed for the Silos, temporarily I place it in the present set.

This is a trial, there will be areas that I need to look at, for example the tube size and using media filled silos with only water on the outside. This style are suitable for plants like Tomatoes, where they don't have rhizomes and tubers constrain by the silo tubes.

The whole idea of this experiment is to make aquaponics cheaper and easier to do. I'll update the progress, 

Easiest Way To Catch A Tilapia

$
0
0
Just to share, not sure if anyone aware of this or not. Use a white colour net, they just swim into it... :)

Maybe Tilapia not intimidated by the colour white.

Short video on it.. :)

Thanks for watching

More Silos to Test

$
0
0
Testing few more silos tubes for my Silos Growbed system, cut few blanks to make the necessary silo pots.


These silos are made for 12" growbed, above are 8" blanks for it. Manage to get 28 blanks from one uPVC tube.


Not going to be over ambitious here, simple plants will do.


Will sow some other plants like tomatoes and eggplant etc.


Due to lack of space in growbed, silos are place within existing growbed.

Pandanus Minimus :)

$
0
0
I had done Pandan in aquaponics in a growbed without constrain and it is a difficult plant to contain. It's roots are very invasive and the plant itself will be vigourous which will colonize the entire growbed if not check.


Last year I tried using a large pot to make sure it does not spread.


This larger container do well in preventing it from spreading and at the same time making it more manageable.


With #SilosGrowbed style that I am currently experimenting, decide to try this invasive plant in one of the tubes.


Without testing we'll never know what's the outcome. Wanted to see how big it will grow and when it multiply how it is going to be contained within the Silos.


Will it be a pigmy pandan or large and spread out on it own ? The roots, will it spread out from bottom of the silo tubes ?

I'll be testing more plants as times goes and hope I'll learn something interesting.

Silo Clips

$
0
0
The conical base of the silos made it not stable if it is free standing in #SilosGrowbed, with LECA surrounding and holding it in place is okay.


However this defeat the purpose of trying to use as minimum LECA as possible.


One way of holding it in place is to tie it together with string, this way it will be self standing. However the drawback is that, if you needs to replace one silos then it may be tricky to do.


Got an idea.. !!! use clips, just like those paper clips, laundry clips to hold the silos together. Made few from TIG welding wires, and looks like it may just work. Welding wire are cheap, they are rust proof, comes in various sizes and materials.


Do a quick bending and manage to get few clips from welding wires that I have laying around the house.


Hand made so the size are variable.


There you go, clip on the silos.


Will need to adjust the bend radius, to make it more tight in holding the silos. There you go, a simple solution to secure the silos in place so that it can be individually work on.

BTW, you don't need many clips to use, just enough to make it free standing especially for those in the outer part of the cluster.

Rosemary Revisited

$
0
0
Rosemary in aquaponics is one plant that I need to retry, it didn't do well the last trial. This time I'll do it in the #SilosGrowbed style aquaponics.

Almost two weeks ago I planted few cuttings and checking it today to see whether there are any sign of positive growth.


Pull out the cuttings from the pot, and it does show some root growth.


It looks good as above, the last time I tried Rosemary due to sludge in the growbed their roots does not look that good as in photo below.


Closer look on the cuttings below, sure is promising.


Re-pot the cuttings in one of the Silo tube, to give it more root zone for better growth.


Since I do not have much growbed space left, the Silo tube are place into existing growbed.


Will be few more weeks before I know for sure whether it will grow in this style of planting.

Dayak Onion

$
0
0
Dayak Onion, Bawang Bukit, Mala Bawang or Bawang Huma are among the names for this plant. Its scientific name is Eleutherine palmifolia (L.) Merr and it is a medicinal plant that is use by the Dayak tribe in Borneo.

Bought a handful from the day market in Pekan, Pahang sold by an Aborigine in that area and I want to try and plant in  in my Aquaponics set.

Few bulb planted in my gutter growbed,

and a few more in the ornamental set.

A few bulbs I planted in normal dirt, just to make sure if the aquaponics trial fail at least I still have few left to try again.

Various studies done on this plant on its medicinal properties. Traditionally used as diuretic, vermifuge, abortifacient, antifertility agent.

MH 370

$
0
0
Latest media statement, confirming Flapperon is from MH 370, as Caregiver for the next of kin on the ill fated flight and as an SME on the airplane type I'm relief to hear this latest development.


I can understand that some of the NOKs are at the stage of denials, I am looking forward with this confirmation that I could normalize my life to what it was before the incident. This has been a difficult and painful period in my Aviation Career.

http://www.bbc.com/news/world-asia-33794012

Goodbye MAS 31 August 2015

Aquaponics Feature in TheEdgeProperty dot com

Gutter Growbed Update 5th Sept 2015

$
0
0
Brief update on this set that I made early July and been running well. Need to test more plants and take note what improvement I can make and address problems that crop up.

So far I'm happy with the setup, it is very easy to maintain and make. There are few fine bits that I need to iron out as time goes by.

Initial setup : Here


Cocopeat Trial

$
0
0
Coco peat soil mix trial on my gutter set is not giving good result, it could be the type of plant that I tried.
Spearmint, on left with coco peat and right with hydroton. Both of these are in the same gutter growbed system.
Bawang Dayak, this in front compare to the one at the back which is in hydroton. The one in hydroton grow better.

These coco peat mix could be waterlogged in the flood & drain system. I will need to use pebbles next to provide alternative to hydroton.

Kailan Need Urgent Transplanting

$
0
0
Kailan long overdue to be transplanted, had time to do it today.
All seedling removed from their pots, a bit thin for my liking but it will do and hope they'll recover.
Some are planted in the potted gutter growbed set and majority are place in the CRAFTS set.


Cluster of four, just in case some didn't make it.
To ensure that seedling is not damage it is recommended that the growbed is flooded. This will ensure the hydroton are easily handle.
Once done you can start the siphon operation by putting the enclosure bell back on. Now I just has to wait for them to be ready for picking.

Bawang Dayak Update

$
0
0
I planted few pots of Bawang Dayak on 2nd of August and today I am checking to see what happening to the plants.

One pot, I place in the gutter growbed and it's time to split it into two pots.

As a comparison another pot I planted in coco peat soil mix and placed it in the gutter growbed, its not doing that good compared to the ones in hydroton.

Few photos of the bawang dayak in the hydroton filled pot.


 Checking the roots to see any sign of root rot or any abnormality with it.

Looking good and there are signs of new bulb emerging from the cluster.

Another shot.


This plant is mainly use as a medicinal herb and not use for day to day cooking. I'll be planting four pots of this in the gutter growbed as an ornamental plant for now.

Another Pump Failed

$
0
0
Another pump fail, this time the pump is running slightly more than a month. Electrical cable that was in the tank got damaged and I don't know what causes it.

I almost got an electric shock when I was about to check the pump operation, luckily I manage to back off before any bigger shock is felt.

Other pump running in the same tank doesn't have any problem like this, there also sign of worn on the spindle. This pump was use the most for two months total, its doesn't look good.

Close up on spindle.

That's it, I will not buy this brand until I can be sure that this will not happen again.

Siphon Operation - Water Range Check

$
0
0
It had been many years that I use the 25mm or the 1" stand pipe siphon with 50 ~ 25mm reducer as funnel and lately I had switch to 20mm and 15mm siphon for my setup.

The 25mm siphon still relevant but since more parts needed for it and the sheer size make it expensive to make and ship.

Few of my earlier growbed are still having the 25mm siphon installed and since I'm phasing out this size, it will be a good time for me to check exactly its water inflow requirements. This to document for future reference or if anyone interested in making one then they will know what needed to be done.

Water inflow is the amount of water going into the growbed, it is not the pump rating. This inflow will depend on pump rating and how high the water needed to be transported up into the growbed. Water inflow means water "On Tap" that is going into the growbed for this test purpose and not the pump rating.

I uses a Rotameter, which is a very simple float type flow meter to check the water inflow to the growbed. Though it is not that accurate as an electronic meter, but for a simple experiment suffice.


I am testing four siphon and will get the average water inflow to trigger and stop the siphon. Setup for the test is like photo above, I am using an old pump that only capable of supplying inflow of up to 1200 liter/hour. It is sufficient to do the test with this capacity.

Those four siphon tested started at a minimum water inflow of 100, 250, 100 and 200 liter per hour due to their different outlet configuration and their condition, which already in operation for almost two and a half years.

The average for above is (100 + 250 + 100 + 200) / 4 = 162.5 liter per hour


The siphon able to cut-off at a maximum inflow of 650, 700, 800, 1000 liter per hour, again due to their condition and outlet configuration.

The average for above is (600 + 700 + 800 + 1000) / 4 = 775 liter per hour.


To get the sweet spot on what is the inflow for this siphon, it will be the mean of the two average at (162.5 + 775) / 2 = 468.75 liter per hour

I recommend the 25 mm or 1" siphon with a funnel uses inflow of about 450 ~ 500 liter per hour. From above test anything above 250 liter per hour will do, but we will need to give some margin for pump deterioration. 450 to 500 liter per hour inflow at the tap should give good result.

To know how much water flowing into the growbed you have to measure the water head, ie the height water transported up as measures from tank water level. You then need to check the pump rating as given on the pump write up as example below.


Table above, if your growbed inlet is one meter above the water level, then the recommended pump for the 25 mm siphon should be the AS-1000 pump. It is not exactly at the 450 to 500 range but it's more than the minimum inflow as tested above. It is okay to use a bigger pump like the AS-2000 in the diagram above, you will then need to divert excess water away from the growbed.

The above finding serve as a rough guide, and by no means define exactly the size or type of pump needed. Your installation may differ but as a ballpark figure, the above estimation will do.
Viewing all 276 articles
Browse latest View live